Teddycloud CC3200 newbie guide

@marco79cgn yes, you are right!
i checked my ip in the router and there it is 192.168.0.165
now when i connect this ip from a different machine in the wifi. it connects to the teddycloud webgui.

so i tried to generate a new altUrl.custom.305.json but now the ip is too long as @chuckf pointed out.
how do i work around it?

As I suspected :slight_smile:

Several options exist:

Deploy an instance of pihole (or another service that can act as local DNS resolver) and use custom DNS entries.

The easiest fix would be probably be to use a static IP for teddycloud that is not too long.

Either refer to the macvlan section of my guide and assign an IP that is .99 or smaller or assign a static IP to your host system.

I donā€™t know whether you use Ubuntu or Ubuntu Server, i.e. whether you have a GUI.

Here is a guide that shows both: https://linuxize.com/post/how-to-configure-static-ip-address-on-ubuntu-20-04/

Choose whatever sounds easier for you. I personally would recommend the macvlan route, also for reasons I pointed out earlier.

I havenā€™t had trouble with static IPs yet, however it canā€™t hurt to use an IP that is outside the DHCP range of your router.

edit: since I may add this the guide in the first post:

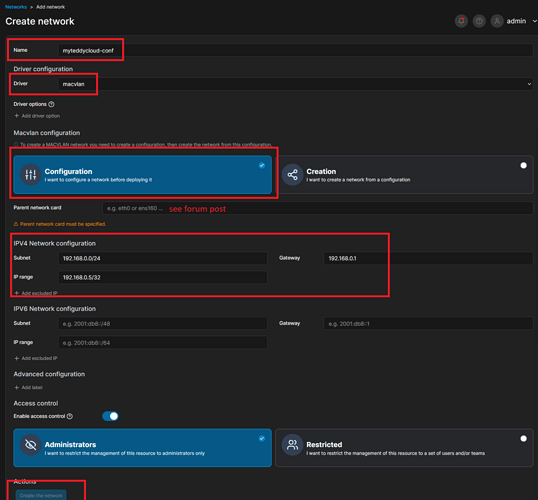
macvlan - create config

You get your adapter via

ip a | grep 192.168.0.165 # or whatever is your host IP

image

or just ip a and scroll up unti you find the entry that shows an IP from your subnet. Look for the network name of your network device (eth0, ens3, ā€¦)

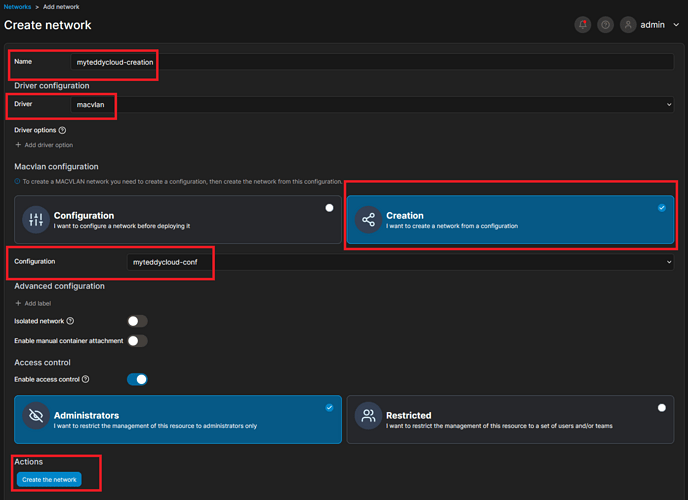
macvlan - create network

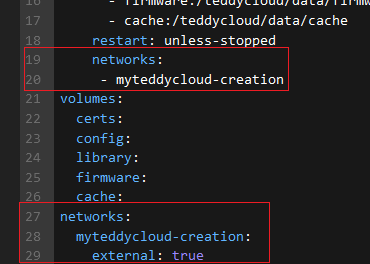
Then uncomment these lines in my docker compose:
image

and then update the stack:

image

No question, just a short summary:
Today I successfully modified my first CC3200 box. I was extra careful and before doing anything else, I connected my CH341A programmer with the SOP8 clamp and dumped the flash chip directly (the 3235 way). Took me 3 minutes, the clamp was sitting perfect at first try. So I secured the certificates and the whole backup.img, just in case anything might go wrong or get grilled.

Afterwards I chose the full custom cfw/bootloader way like described in this newbie guide (thx @chuckf). This took me more than an hour. I only had resistor wires and I would totally NOT recommend this for beginners (even though Iā€™m one of them). Way too error prone in my opinion. The inner diameter of the wholes is not equal, only one of my five wires fitted directly through. Buy the Tag Connect/PCB clip instead! Would have saved me a lot of time and grey hairs.

Things I noticed: The UART jumper was set to 5V by default (dangerous). The FT232RL UART only worked with additional external power (either battery or power supply) - in contrast to the CH341A (no additional power needed). Besides the wires, most complicated for me was understanding how the bootloader works and e.g. that the ofw2 bin is not physically there but will be created automagically. I really like the built-in DNS changes (compared to my CC3235 box). Thanks to all for your great work and efforts. And your help. And for the newbie guides. :slight_smile:

PS: I did the whole thing on a Raspberry Pi (Linux). The UART programmer is not COM3 in this case but /dev/ttyUSB0 (or similar).

You forget that you are already used to the ch341 programmer. Thatā€™s saves a lot of time :wink:

If you buy the tag connector it would be also a way easier. (Yes itā€™s more expansive than the programmer)

Besides that, feel free to add a guide using your approach (quite sure itā€™s mostly identical to the 3235 one). As this seems to be more fail prove ( no 5v fail) this would be a good addition

@henryk Yes, I already had some experience with the CH341A programmer. But also back then it was a LOT easier to handle.

Now with the CC3200 box, I just used the CH341A as additional step just to be sure to have the firmware/certificates secured. I just read the flash, nothing more.

So afterwards, I went the complete way described in this guide here, with UART, the wires, etc.

Out of curiosity: Is it possible to patch/write the c2.der, pre-img.bin and mcuimg.bin with the cc3200 tool directly into a dumped backup.img and then just use flashrom and the CH341A to write it to the flash chip? In other words: modify the 3200 only with CH341A? I didnā€™t think that far, but this should be possible, right?

Something like:
cc3200tool -if backupCC3200.bin -of cc3200-flash.custom.bin write_file /home/pi/toniebox/certs/server/ca.der /cert/c2.der

//EDIT: not possible:

CC3200Error: /cert/c2.der or id -1 not found, but only overwriting is supported.

Nevermind!

now it works!
thanks a lot for the great support i got from you all.
and also @chuckf thank you very much for this guide!

here is what i did:

first i tried with pi-hole. during installation i had to change the ports 54:53 and 81:80 and 67:67. maybe thats the reason it didnā€™t work, i dont know. but i could install it on portainer and open it. i used local dns setting and added some names which were forwarded to my ip. but i could not make it work.

i havent tried the macvlan yet.

but i had a different idea. i simply changed my ip in the router to 12 characters, then generated a new altUrl.custom.305.json and loaded it on the sd. and this is working. can i leave it like this, is that a valid solution?

Happy to help! Iā€™m not as knowledgeable as many others, but whenever I can give back to the community Iā€™m taking from, even with my limited knowledge, Iā€™ll try.

Same idea, different executions. Many ways lead to rome: Limit the IP of your teddycloud instance to 12 chars.

Itā€™s okay. Iā€™m no networking expert, you just need to keep in mind whenever you switch to a new router / do something that could potentially reset that configuration that you would need to redo these steps. I assume your setting said always assign this IP to this device.

If the device itself (macvlan / configure the host) says: ā€œHey, donā€™t assign me an IP based on DHCP, take this oneā€ itā€™s indepent of the router (settings) and should be somewhat more reliable.
I also assigned static IPs inside my DHCP range of the router, and havenā€™t had problems during the past two years at all, though it wouldnā€™t be the recommendation. Ideally you would always need to check, when you get a new router (or any other device handling DHCP in your network) to make sure the static IPs are outside of that range, but how often do you realistically run into that problem?
So basically I would say your solution is as good as any, with the exception of macvlan, since this would allow you to not run into this problem:

@the others, Iā€™ll reply tonight after work :slight_smile:

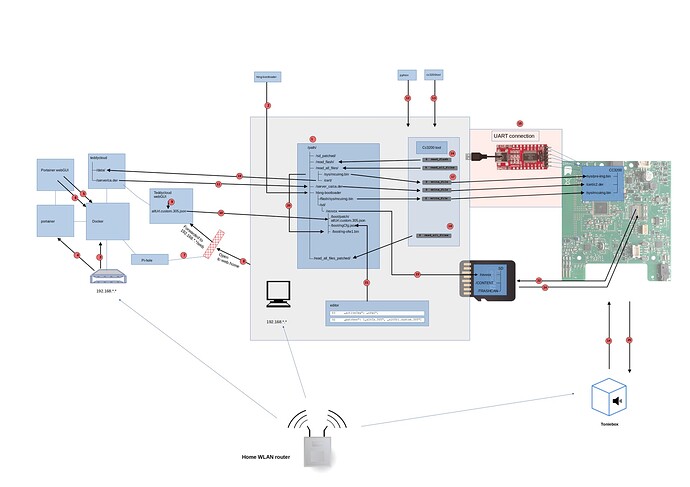
hi, i wanted to show you a graphic overview of the process i followed, which show the essential steps, at least what i understood.
i think something like this as an addition to this guide would be helpful to understand what happens and to get a complete picture of the process.

each step from the guide can now be referenced to the overview.
simplified example:

  1. create folder containing following sub-folders
    sd_patched
    read_flash
    read_all_files
    server_ca
    hbng-bootloader
    read_all_files_patched
  2. download hbng-bootloader and sav it under /path/hbng-bootloader
  3. install docker
  4. install portainer
  5. install teddycloud
  6. install pi-hole
  7. create local DNS for teddycloud webUI. For example: tc-web.home
  8. open teddycloud webUI over the specified DNS
  9. generate altUrl.custom.305.json in teddycloud
  10. save the generate altUrl.custom.305.json to your /path/boot/patch/altUrl
  11. save /server/ca.der from teddycloud to /path/server_ca/ca.der
  12. install python
  13. install cc3200tool
  14. disassemble toniebox
  15. connect toniebox board with UART to computer. connect battery-pack to tonie board.
  16. use cc3200 tool to create backups with command read_flash to create path/read_flash/backup.bin and read_all_files to create path/read_all_files/
  17. use cc3200 tool to write files on tonie board
    path/read_all_files/sys/mcuimg.bin ā†’ sys/pre-img.bin
    path/server_ca/ca.de ā†’ /cert/c2.de
    path/hbng-bootloader/flash/sys/mcuimg.bin ā†’ /sys/mcuimg.bin
  18. use command read_all_files to create path/read_all_files_patched/ then remove UART and remove battery pack
  19. copy path/read_all_files/cert/ to teddycloud data folder
  20. copy path/read_all_files/sys/mcuimg.bin to path/hbng-bootloader/sd/revvox/boot/ng-ofw1.bin
  21. open with editor path/hbng-bootloader/sd/revvox/boot//ngCfg.jason
    and make changes in line 01 and 32
  22. remove sd from tonie board and connect it to computer
  23. copy complete folder path/hbng-bootloader/sd/revvox to sd drive sd:/
  24. remove sd card and put it back in tonie board
  25. reassemble tonie box

Unfortunately, something doesnā€™t seem to be working for me. Iā€™ve installed everything and connected the adapter; it even seems to respond to requests. However, as soon as I issue a command, I always get ā€œ- - timed out while waiting for ack.ā€

Can you post your connections?

Do you have a DTR Pin and use the reset dtr part in the commands?

Is your Toniebox also powered externally?

@LucaToni thanks for the overview. I was also planning on using visuals to accompany the guide, but I was thinking much simpler images.
Iā€™ll link your post on the next revision. Personally I think itā€™s a bit overwhelming but everyone is different so some people may need exactly that overview.
The only problematic but I identified is, that you use different syntax / naming scheme than the guide.

So, I managed to extract the first command, but now Iā€™m struggling with the server certificates.
Thatā€™s also one of my criticisms about the instructionsā€”many things are assumed, and you have to check every single step and figure out how it actually works.
For me, it helped to start the command with --reset.

Iā€™ve never worked with Docker before, and with Proxmox either. These are a lot of new systems for me all at once.
Especially when you donā€™t work much with Linux, navigating through it all is really tedious.

Please elaborate:)

The usage of the reset part is mentioned in the guide though.

I already started removing portainer (I assume you meant that instead of proxmox) from the guide, havenā€™t had to time to completely overhaul it.
I want to target the guide more to first time users and they donā€™t necessarily need portainer. I have to read up on how to setup macvlan without portainer first and verify a possible solution I present here works.

Feel invited to pick apart the guide and list everything you donā€™t like or understand. In the end I have everything working and you donā€™t and the guide is supposed to close that bridge, so Iā€™m happy to respond to feedback and update the guide accordingly.

As a final word though, unfortunately this guide or rather the whole process itself requires some prior knowledge or forces the user to read up on some basics. I cannot change that, itā€™s in the nature of this project. The team responsible for development already implemented some things in the GUI, which should be more approachable for most users, but I fear not everything can be done there.

Looking forward to your input :slight_smile:

I have found the server certificates, but I cannot get them onto my machine to upload them to the box afterward. It would be much simpler to offer a download option from the web interface, similar to the upload feature. This would significantly reduce the steps in the instructions.

I am using Ubuntu as a client, with Proxmox running on another server in the network. On top of that, there is Portainer and then Teddy Cloud. I am really struggling to retrieve the certificates.

So either you found the docker volume on the host or you already mapped the certs folder somewhere on the host.

If I understand you correctly itā€™s just a matter of transferring the files between machines.

So you need to transfer the files from the Ubuntu VM running on proxmox to the machine where you connected the programmer?

a) scroll up, I should have an example in the guide and some post here, where I should on how to send / retrieve files via scp. This assumes you can connect to your Ubuntu VM via ssh.
Edit: refer to 2.2 in the guide.

b) setup a network share that can be both accessed from your machine you need to get the cert to and the Ubuntu VM.

Iā€™m at work, so I may take some time to respond / im only on mobile.

On your Proxmox/Teddycloud machine, enter the following command wich will print all used volumes including their host paths:

docker inspect -f '{{range .Mounts}}{{.Type}}: {{.Source}} => {{.Destination}}{{println}}{{ end }}' teddycloud

If you set up teddycloud with the default yaml from Team Revvox, the certificate path on your host should most likely be this one: /var/lib/docker/volumes/teddycloud_certs/_data

So you can find the server ca.der of your Teddycloud here:

/var/lib/docker/volumes/teddycloud_certs/_data/server/ca.der

You only need this single file for flashing the box. So if you want to copy this file to your other machine (Ubuntu client), you can use this scp command on your proxmox/teddycloud server:

sudo scp /var/lib/docker/volumes/teddycloud_certs/_data/server/ca.der pi@192.168.178.11:/home/pi/

Please adapt the username (pi in this example) and the ip address of your ubuntu client (192.168.178.11 in this example). Of course you can change the target path (/home/pi/), just make sure that it exists on your ubuntu client.

ok, now i have the Cert, thanks

I just noticed that ExtractedFromBox is empty. When I execute the command, I get the following error:

ā€œfound file without filename, skipping indexā€¦ā€ ā€œone or more files could not be verified or read at allā€

I had the same problem and this is even explicitly mentioned in this Guide here.

Instead of using only this single command:

cc3200tool -p COM3 read_all_files ExtractedFromBox/ read_flash backup.bin

which leads to your exception and an empty ExtractedFromBox folder, just use these two commands (one after another):

cc3200tool -p COM3 read_all_files ExtractedFromBox/

cc3200tool -p COM3 read_flash backup.bin

Make sure that the ExtractedFromBox folder is not empty afterwards and that the backup.bin is valid. Something like strings backup.bin | grep Boxine

Output:

Boxine GmbH1
	Boxine CA0
Boxine GmbH1
	Boxine CA0
Boxine Factory SubCA 040 
Boxine GmbH1

i use

/root/.local/bin/cc3200tool -p /dev/ttyUSB0 --reset drt read_all_files ExtractedFromBox/

but Folder is Emty,

and
/root/.local/bin/cc3200tool -p /dev/ttyUSB0 --reset drt read_flash backup.bin
for bin, it needs a long time

There is a typo in your reset command. Correct is --reset dtr (not drt).

Please try again. It must not be empty. Otherwise there is a connection problem with your uart programmer. Can you copy the output after you send this command?

root@jenke:/home/jenke/toniebox1# /root/.local/bin/cc3200tool -p /dev/ttyUSB0 --reset dtr read_all_files ExtractedFromBox/
2024-12-10 13:43:57,094 -- Connecting to target...
2024-12-10 13:43:59,452 -- timed out while waiting for ack
2024-12-10 13:44:01,710 -- timed out while waiting for ack
2024-12-10 13:44:01,962 -- Connected, reading version...
2024-12-10 13:44:01,973 -- connected to target
2024-12-10 13:44:01,973 -- Version: CC3x00VersionInfo((0, 4, 1, 2), (0, 0, 0, 0), (0, 0, 0, 0), (0, 0, 0, 0), (16, 0, 0, 0))
2024-12-10 13:44:01,973 -- This is a CC3200 device
2024-12-10 13:44:01,974 -- Switching to NWP bootloader...
2024-12-10 13:44:01,989 -- Switching UART to APPS...
2024-12-10 13:44:02,006 -- Resetting communications ...
2024-12-10 13:44:03,269 -- Uploading rbtl3100s.dll...
2024-12-10 13:44:03,270 -- Reading rbtl3100s.dll from file /root/.local/share/pipx/venvs/cc3200tool/lib/python3.12/site-packages/cc3200tool/dll/rbtl3100s.dll
2024-12-10 13:44:03,270 -- Getting storage list...
2024-12-10 13:44:04,005 -- APPS version: CC3x00VersionInfo((0, 4, 0, 2), (0, 0, 0, 0), (0, 0, 0, 0), (0, 0, 0, 0), (16, 0, 0, 0))
2024-12-10 13:44:04,005 -- Getting storage info...
2024-12-10 13:44:04,021 -- storage #2 info bytes: 0x10, 0x0, 0x4, 0x0, 0x0, 0x0, 0x0, 0x0
2024-12-10 13:44:04,021 -- Getting storage list...
2024-12-10 13:44:04,037 -- Reading raw storage #2 start 0x0, size 0x2000...
..
2024-12-10 13:44:04,164 -- [0] detected a valid FAT revision: 54
2024-12-10 13:44:04,164 -- [1] detected a valid FAT revision: 53
2024-12-10 13:44:04,164 -- Getting storage list...
2024-12-10 13:44:04,180 -- Reading raw storage #2 start 0x1774, size 0x2774...
...
2024-12-10 13:44:04,344 -- selected FAT revision: 54 (active)
2024-12-10 13:44:04,344 -- Serial Flash block size: 4096 bytes
2024-12-10 13:44:04,344 -- Serial Flash capacity: 1024 blocks
2024-12-10 13:44:04,344 --
2024-12-10 13:44:04,345 -- file start size fail flags total filename
2024-12-10 13:44:04,345 -- index block [BLKs] safe [BLKs]
2024-12-10 13:44:04,345 -- ----------------------------------------------------------------------------
2024-12-10 13:44:04,345 -- N/A 0 5 N/A N/A 5 FATFS
2024-12-10 13:44:04,345 -- 0 71 8 yes 0x0 16
2024-12-10 13:44:04,345 -- 4 105 1 no 0x4 1
2024-12-10 13:44:04,345 -- 6 106 53 yes 0x0 106
2024-12-10 13:44:04,345 -- 7 212 53 no 0x4 53
2024-12-10 13:44:04,345 -- 8 265 53 no 0xc 53
2024-12-10 13:44:04,345 -- 9 408 5 yes 0x8 10
2024-12-10 13:44:04,345 -- 10 418 1 yes 0x8 2
2024-12-10 13:44:04,345 -- 11 5 33 yes 0x8 66
2024-12-10 13:44:04,345 -- 12 87 1 yes 0x8 2
2024-12-10 13:44:04,345 -- 13 89 1 yes 0x8 2
2024-12-10 13:44:04,345 -- 14 91 1 yes 0x8 2
2024-12-10 13:44:04,345 -- 15 93 1 yes 0x8 2
2024-12-10 13:44:04,345 -- 16 95 1 yes 0x8 2
2024-12-10 13:44:04,345 -- 17 97 2 yes 0x8 4
2024-12-10 13:44:04,345 -- 18 101 1 yes 0x8 2
2024-12-10 13:44:04,345 -- 19 103 1 yes 0x8 2
2024-12-10 13:44:04,345 -- 20 318 40 yes 0x8 80
2024-12-10 13:44:04,345 -- 21 398 4 yes 0x8 8
2024-12-10 13:44:04,345 -- 22 406 1 yes 0x8 2
2024-12-10 13:44:04,345 -- 23 931 1 yes 0x8 2
2024-12-10 13:44:04,345 -- 24 421 255 yes 0x8 510
2024-12-10 13:44:04,345 -- 26 933 1 yes 0x8 2
2024-12-10 13:44:04,345 -- 27 420 1 no 0xc 1
2024-12-10 13:44:04,345 -- 28 935 1 no 0xc 1
2024-12-10 13:44:04,345 -- 29 936 1 yes 0x8 2
2024-12-10 13:44:04,345 --
2024-12-10 13:44:04,345 --    Flash usage
2024-12-10 13:44:04,345 -- -------------------------
2024-12-10 13:44:04,346 -- used space: 938 blocks
2024-12-10 13:44:04,346 -- free space: 86 blocks
2024-12-10 13:44:04,346 -- memory hole: [938-1023]
2024-12-10 13:44:04,346 -- Found file without filename, skipping index=0
2024-12-10 13:44:04,346 -- Found file without filename, skipping index=4
2024-12-10 13:44:04,346 -- Found file without filename, skipping index=6
2024-12-10 13:44:04,346 -- Found file without filename, skipping index=7
2024-12-10 13:44:04,346 -- Found file without filename, skipping index=8
2024-12-10 13:44:04,346 -- Found file without filename, skipping index=9
2024-12-10 13:44:04,346 -- Found file without filename, skipping index=10
2024-12-10 13:44:04,346 -- Found file without filename, skipping index=11
2024-12-10 13:44:04,346 -- Found file without filename, skipping index=12
2024-12-10 13:44:04,346 -- Found file without filename, skipping index=13
2024-12-10 13:44:04,346 -- Found file without filename, skipping index=14
2024-12-10 13:44:04,346 -- Found file without filename, skipping index=15
2024-12-10 13:44:04,346 -- Found file without filename, skipping index=16
2024-12-10 13:44:04,346 -- Found file without filename, skipping index=17
2024-12-10 13:44:04,346 -- Found file without filename, skipping index=18
2024-12-10 13:44:04,346 -- Found file without filename, skipping index=19
2024-12-10 13:44:04,346 -- Found file without filename, skipping index=20
2024-12-10 13:44:04,346 -- Found file without filename, skipping index=21
2024-12-10 13:44:04,346 -- Found file without filename, skipping index=22
2024-12-10 13:44:04,346 -- Found file without filename, skipping index=23
2024-12-10 13:44:04,346 -- Found file without filename, skipping index=24
2024-12-10 13:44:04,346 -- Found file without filename, skipping index=26
2024-12-10 13:44:04,346 -- Found file without filename, skipping index=27
2024-12-10 13:44:04,346 -- Found file without filename, skipping index=28
2024-12-10 13:44:04,346 -- Found file without filename, skipping index=29
2024-12-10 13:44:04,346 -- One or more files could not be verified or read at all