Hi there,
within this post I try to make a documentation how to set up Teddycloud on a CC3235 Box.
![]() Read the official documentation as well
Read the official documentation as well ![]()
![]() Proceed at your own risk (which is quite low)
Proceed at your own risk (which is quite low) ![]()
![]() Intro
Intro ![]()
Only two weeks ago I bought my first Toniebox ever with the goal to patch it and run Teddycloud. I finally succeeded but the process was a LOT of trial & error. Furthermore I had to search and read on dozens of different places in order to get & understand the whole picture and to find solutions for my problems (and misunderstandings). That’s why I decided to write a complete HowTo in order to help other people to get it done as well. Especially after the YouTube Tutorial from myDealz (for the ESP32 boxes) a lot of people asked for a complete guide which is also suitable for “normal” people (not only IT nerds). I used the Teddycloud ESP32 Newbie Documentation from @Wurst420 as a template and adapted it for the CC3235. This box is said to be more difficult to handle but at the end, it’s not so complicated at all.
ㅤ
![]() Explanation & Goal
Explanation & Goal ![]()
What’s the goal of this whole project? And how does Teddycloud work at all?
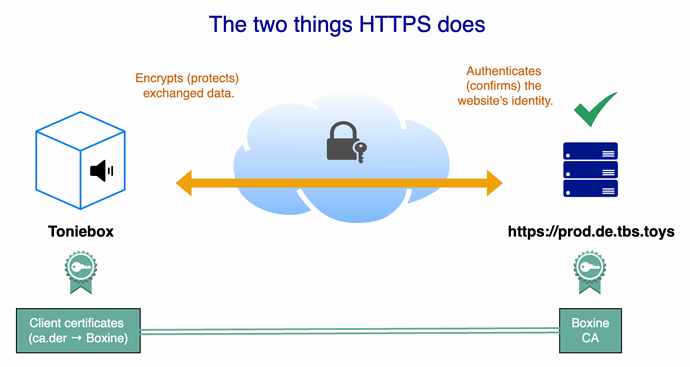
Well, an unmodified Toniebox is communicating with the official Toniecloud (by Boxine) for example to download any audio content (besides other things). So when you put a Tonie on the box, the real content of the audiobook will be downloaded from the Toniecloud (once) and is stored on the Toniebox for offline listening. The communication between the Toniebox and the Toniecloud takes place on a secured HTTPS connection, so certificates are needed on both sides (server/client). Without going too much into technical details, this is a simplified overview:
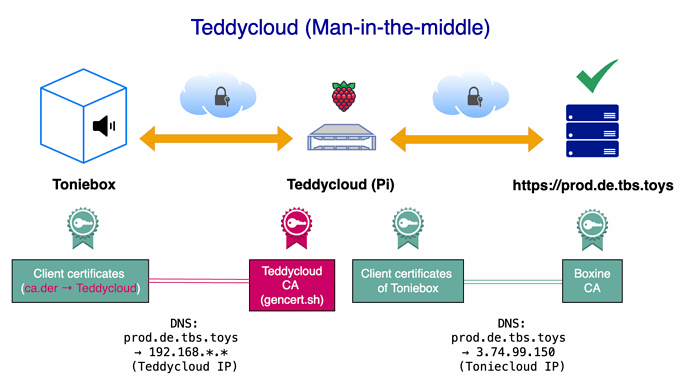
Now think of our self-hosted Teddycloud as a man-in-the-middle between the Toniebox and the Toniecloud. So at the end of this tutorial, the Toniebox won’t communicate with the Toniecloud/Boxine anymore but only with the Teddycloud. The Teddycloud itself needs to pretend to be a real Toniebox in order to be allowed to communicate with the original Toniecloud. And in order to achieve this, we need to extract the client certificates from our Toniebox and store them in Teddycloud so that from now on our Teddycloud looks like a real Toniebox from Boxine’s point of view. Without the client certificates, the original cloud won’t let Teddycloud download any content and not even establish a coummunication.
As a last step, the Toniebox needs to communicate with our new Teddycloud and this also needs to take place in a secured HTTPS way. That’s why we have to use a (self-generated) CA certificate on the Teddycloud Server and this certificate has to be known by the Toniebox as well (because never trust a stranger). So we need to patch the original firmware of the Toniebox and replace the original CA certificate (from Boxine) with our self-generated one of the Teddycloud. Finally this patched firmware has to be written to the flash chip of the Toniebox. In addition to that, we have to change our local DNS for the Toniebox and point a public url to our Teddycloud instance. This is necessary because besides the CA certificate, we don’t change a single thing in the original firmware. So when our Toniebox wants to connect to the Toniecloud (prod.de.tbs.toys) after we put a Tonie on it, this call should not lead to the official server (Boxine) but to our local Teddycloud.
The Teddycloud itself on the other hand needs to resolve the official Boxine server, so we have to make sure that our DNS change is not effective for the Teddycloud instance. Of course It’s up to the enduser to decide whether the original Toniecloud should be used in the first place. This feature actually is turned off by default. But you have to activate it if you want to continue using original Tonies and download/listen to their original audio content. Be aware that the Teddycloud already filters a lot of unnecessary traffic between the Toniebox and the Toniecloud, like analytics data (how often you listen to what etc.). And even if you never plan to use the Toniecloud again, you still have to patch the firmware of the Toniebox so that it can establish a secure connection with your Teddycloud.
ㅤ
![]() Tools
Tools ![]()
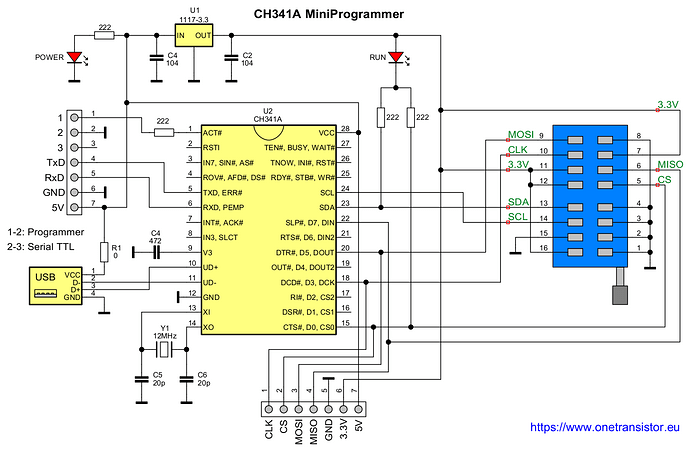
I will make use of Docker in this tutorial and try to cover every single step needed. I’m using a Raspberry Pi running the official Raspberry Pi OS (bookworm) and the Lite Version which is headless, so there is no graphical window management/Desktop. But the full version also works just fine. All steps in this HowTo will take place in a Shell/Terminal session from the command line. So either SSH into your Raspberry Pi (headless) or use the Terminal App. Be aware that every other Linux distribution and even Windows should work as well. For this guide we’ll use a CH341A programmer since it’s cheap and easy to get. As always, Ali Express is the cheapest option but I bought my set at Amazon:
Amazon.de
ㅤ
![]() Preparation & Setup
Preparation & Setup ![]()
Toniebox:
If your Toniebox is brand new, please set it up with the official Tonies App. Make sure that it is connected to your WiFi and that the latest software update is installed.
Raspberry Pi:
-
Set up Raspberry Pi OS and install the latest updates:
sudo apt update && sudo apt upgrade -
install Docker
curl -sSL https://get.docker.com | sh
sudo usermod -aG docker $USER -
install Portainer
highly recommended in order to manage your docker environment with a GUI, check the logs etc. -
install Python & CC3200 Tool
Python is needed for the CC3200 Tool. We need this tool in order to patch the extracted firmware from our Toniebox. The original Boxine CA certificate will be replaced with the CA certificate which we will create with thegencert.shscript (in a later step). Python has its own package manager namedpip. Because Raspberry Pi OS already has theaptpackage manager, we need to create a virtual environment for Python so that those two managers won’t conflict with each other.
sudo apt install python3-pip
sudo apt install python3-venv
python3 -m venv .venv
source .venv/bin/activate
pip install git+https://github.com/toniebox-reverse-engineering/cc3200tool.git
-
install Flashrom
Not needed on a Raspberry Pi because it’s already prebundled. Otherwise run:
sudo apt install flashrom -
install Teddycloud
Open the Portainer GUI (https://192.168.178.10:9443), select your local environment and then choose Stacks in the menu on the left. Stacks is the equivalent of docker-compose. Click on “Add Stack”, name it “teddycloud” and paste the following content:
services:
  teddycloud:
    container_name: teddycloud
    hostname: teddycloud
    image: ghcr.io/toniebox-reverse-engineering/teddycloud:latest
    dns:
      - 1.1.1.1
    ports:
     - 80:80
     - 8443:8443
     - 443:443 #Port is needed for the connection for the box, must not be changed!
    volumes:
      - certs:/teddycloud/certs
      - config:/teddycloud/config
      - content:/teddycloud/data/content
      - library:/teddycloud/data/library
      - firmware:/teddycloud/data/firmware
      - cache:/teddycloud/data/cache
    restart: unless-stopped
volumes:
  certs:
  config:
  content:
  library:
  firmware:
  cache:
- Generate certificates
At the first start of Teddycloud, it will create the needed server certificates automatically. Unfortunately there is a problem with these certificates and they are not usable for the CC3235 chip. So we won’t use the generated ones but we will create new certificates by ourself and replace the ones from the first start (Step 8).
sudo apt update && sudo apt install faketime
cd && mkdir toniebox && cd toniebox
wget "https://raw.githubusercontent.com/toniebox-reverse-engineering/teddycloud/master/contrib/gencerts.sh" -O gencert.sh
chmod 755 gencert.sh
./gencert.sh
- Copy certificates to Teddycloud
From the previous step, we only need the files from the server directory (/home/pi/toniebox/certs/server). The generated files in the client folder can be ignored. We will copy the server certs to the correct folder of Teddycloud and restart Teddycloud afterwards:
docker cp ~/toniebox/certs/server/ teddycloud:/teddycloud/certs/server
docker restart teddycloud
ㅤ
![]() Connect flash chip with programmer
Connect flash chip with programmer ![]()
We have to open the box and obtain the plain mainboard without any connected cables attached. The process is the same as for ESP32 boxes like shown in this video (starting 14m58s): https://youtu.be/JpMRyshgy9o?t=899
Be aware that the board is connected to the RFID reader with 6 pins at the bottom right side (the opposite side of the headphone jack)! So when trying to remove it, make sure to push it upwards (to the top) to avoid bending these pins by accident.
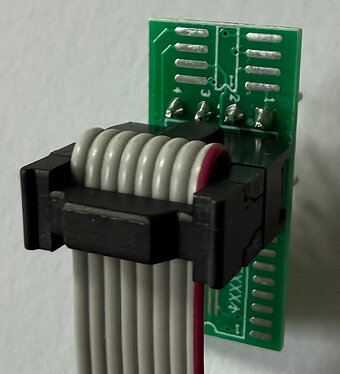
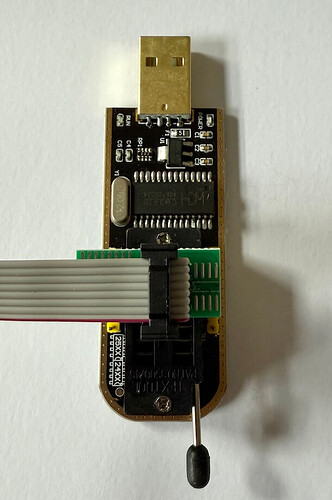
We need the SOP8 board from our programmer’s set which is labeled 25XXX and has 8 pins on each side of the board. The ribbon cable needs to be plugged on this board making sure that the red cable is connected to Pin 1.
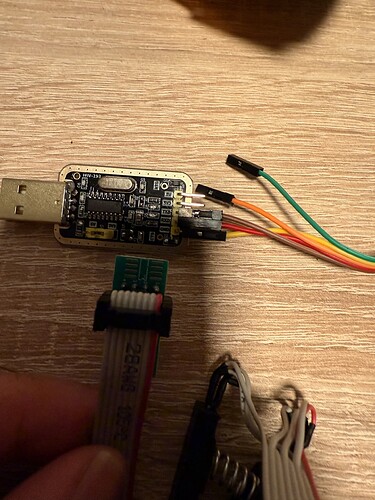
Now we need to plug the other side of this board onto the programmer. With the programmer lying in front of us and the USB-A plug pointing upwards (like in the picture), please make sure to put the pins of the SOP8 board into the upper 8 wholes of the programmer. You need to open the little arm first by putting it upwards, pointing to the sky. The red cable has to be placed downwards. It shuold look exactly like this:
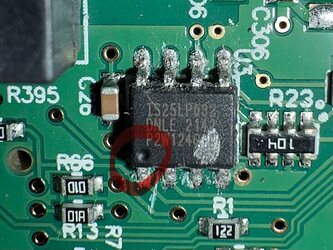
Now with the mainboard separated and lying in front of you, locate the IS25LP032 chip. This is where the clamp has to be connected to. Pin 1 of this chip is marked with a round black circle. Make sure that the red cable on the clamp will be connected to Pin 1.
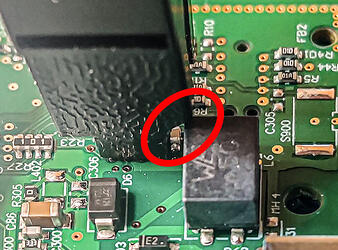
Most probably you will have to cut a part of the plastic enclosure of the clamp because there is another chip right next to the flash chip which makes it impossible to get the clamp connected to the flash chip properly. I used a carpet cutter to trim it.
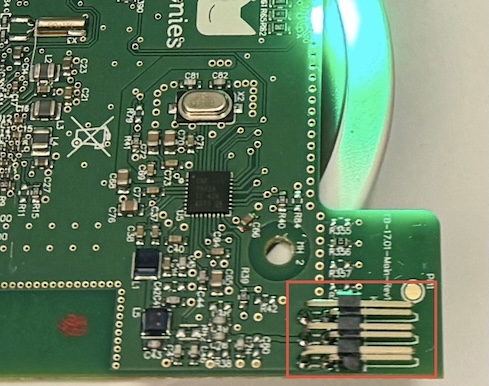
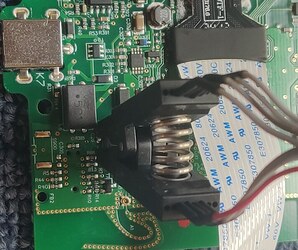
It is very important that the clamp sits tight and correct! It might take a few tries to get it on. Make sure that it looks like this before connecting the programmer to the Raspberry Pi:
ㅤ
![]() Read, patch & write the certificate/firmware
Read, patch & write the certificate/firmware ![]()
Connect the CH341A USB programmer to the Raspberry Pi. The green LED of the Toniebox mainboard should be constantly green (no flashing/blinking). If that’s not the case, your clamp is most probably not sitting correctly. Before you try it again, unplug the programmer first! Be aware that you don’t need to connect the battery or the power outlet to the Toniebox mainboard. It will be powered via USB by the CH341A programmer.
- Now let’s check if the programmer is recognized by the Raspberry Pi.
Typelsusbin the Terminal and the output should list your usb programmer:
pi@raspi:~/toniebox/certs $ lsusb
Bus 004 Device 012: ID 1a86:5512 QinHeng Electronics CH341 in EPP/MEM/I2C mode, EPP/I2C adapter
Bus 004 Device 001: ID 1d6b:0001 Linux Foundation 1.1 root hub
Bus 002 Device 001: ID 1d6b:0002 Linux Foundation 2.0 root hub
Bus 003 Device 001: ID 1d6b:0001 Linux Foundation 1.1 root hub
Bus 001 Device 001: ID 1d6b:0002 Linux Foundation 2.0 root hub
-
Read the original firmware from the Toniebox with this command:
sudo flashrom -p ch341a_spi -r backupCC3235.bin
If everything went smooth, the output should look like this at the end:
Reading flash... done. -
Verify firmware
To double check that the firmware has been dumped successfully, check the size of thebackupCC3235.binfile. It should be 4 MB. You can also check the content of the dump using the strings function. The output should look like this:
pi@raspi:~/toniebox/certs $ ls -lah
total 4.0M
drwxr-xr-x 3 pi pi 4.0K Nov 10 18:19 .
drwxr-xr-x 4 pi pi 4.0K Nov  6 00:33 ..
-rw-r--r-- 1 pi pi 4.0M Nov  7 16:09 backupCC3235.bin

pi@raspi:~/toniebox/certs $ strings backupCC3235.bin | grep "Boxine GmbH Root CA"
 Boxine GmbH Root CA Code Signing0
 Boxine GmbH Root CA Code Signing0
 Boxine GmbH Root CA Code Signing0
- Extract certificates from dumped firmware
Now we’ll extract the certificates from the dumped firmware using the CC3200 Tool.
pi@raspi:~/toniebox/certs $ source ~/.venv/bin/activate
pi@raspi:~/toniebox/certs $ cc3200tool -if backupCC3235.bin -d cc32xx read_all_files extract/
- Copy client certificates to teddycloud
The extracted client certificates from the previous step should now be located in the~/toniebox/certs/extract/certfolder. We need to copy them to the Teddycloud cert directory so that from now on the teddycloud can act like it would be our real Toniebox.
docker cp ~/toniebox/certs/extract/cert/ca.der teddycloud:/teddycloud/certs/client/ca.der
docker cp ~/toniebox/certs/extract/cert/client.der teddycloud:/teddycloud/certs/client/client.der
docker cp ~/toniebox/certs/extract/cert/private.der teddycloud:/teddycloud/certs/client/private.der
docker restart teddycloud
- Patch original firmware
Communication with the real Toniecloud will be exclusive to Teddycloud from now on. Our Toniebox should not communicate with the original Toniecloud (Boxine) anymore. The Teddycloud is so to say the man-in-the-middle between our Toniebox and the Toniecloud. In order to make our Toniebox communicate with our self-hosted Teddycloud, we have to patch the server certificate (CA) of the Teddycloud (which we created with the gencert.sh script earlier) into the firmware of the Toniebox. This is absolutely necessary so that the Toniebox can communicate with our Teddycloud secured via https, like it did before with the original cloud. Therefore we have to replace the Boxine CA in the original firmware with our self-generated CA certificate. The replacing can be done with the CC3200 Tool as well:
pi@raspi:~/toniebox/certs $ cc3200tool -if backupCC3235.bin -of cc3235-flash.customca.bin -d cc32xx write_file /home/pi/toniebox/certs/server/ca.der /cert/ca.der
- command parameters explained:
-if backupCC3235.bin → input file (our dumped original firmware)
-of cc3235-flash.customca.bin → output file (which we will write onto the chip later)
/home/pi/toniebox/certs/server/ca.der → path of our generated Teddycloud certificate - replacepiwith your user if necessary! (full path needed here)
/cert/ca.der → path inside the firmware (don’t change it!)
- Write patched firmware to the flash chip
In the final step we’ll write the patched firmware to the flash chip of the Toniebox using flashrom:
pi@raspi:~/toniebox/certs $ sudo flashrom -p ch341a_spi -w cc3235-flash.customca.bin
-
Disconnect mainboard
The programmer can now be unplugged from the Pi and afterwards(!) the clamp from the flash chip as well. -
Change DNS
Set the DNS entries forprod.de.tbs.toysandrtnl.bxcl.deto the local ip-address of your Teddycloud instance (Raspberry Pi). There are different solutions depending on your home setup. I’m using Pihole as DNS in my local network so the simplest solution for me was to edit the/etc/hostsfile on my Pihole and adding two lines:
192.168.178.11  prod.de.tbs.toys
192.168.178.11  rtnl.bxcl.de
- There are also solutions for AdGuard and OpenWRT which you can find in the official Teddycloud GUI (Add Toniebox → CC3235 → DNS tab). Be aware that this step is very important and you have to find a way to configure the DNS for these two domains. Otherwise the Toniebox won’t connect to Teddycloud (Codword: Owl). Unfortunately it’s not possible with the CC3235 box to flash those DNS rules directly in the box firmware (like the ESP32).
- Reassemble and Test
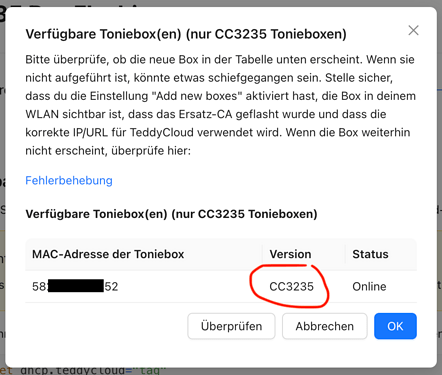
Before you reassemble your box completely, connect only the three cables (speaker, buttons & battery) in order to start the Toniebox. Open your Teddycloud GUI in the Browser and check whether your Toniebox is recognized. Go to http://192.168.xxx.xxx/web/tonieboxes/boxsetup/cc3235/flashing, click through the end and push the “Show available boxes” button. Have fun!
ㅤㅤㅤ
ㅤ
Big thanks to Team revoxx and inonoob for his great CC3235 tutorial (which makes it to the official teddycloud v0.6.3 tutorial) and his help on github.
ㅤ
![]() Troubleshooting / FAQ:
Troubleshooting / FAQ: ![]()
![]() Glibberish output or no connection when trying to read the flash chip
Glibberish output or no connection when trying to read the flash chip
Recheck the connection of the clamp on the flash chip. Make sure it is aligned properly. Verify that the Toniebox LED is constantly green and the power LED of the programmer is red. Also make sure that lsusb still shows your programmer as soon as the clamp is connected to the board. The first programmer I bought was faulty (dead on arrival) and disconnected as soon as the clamp was sitting perfectly fine.
![]() My Toniebox won’t connect to Teddycloud
My Toniebox won’t connect to Teddycloud
Check the logs of your Teddycloud container. You can do this either by clicking the “Logs” button in Portainer → Containers → teddycloud or by using the Terminal with the following command:
docker logs -f teddycloud
Make sure that the certificates are correctly parsed.
![]() Refreshing the box leads to error code “owl” (Eule)
Refreshing the box leads to error code “owl” (Eule)
Either you flashed the wrong certificate (or a broken one) or your box is still communicating with the Boxine Toniecloud directly. Make sure to set the DNS correct and effectively (Step 10).
![]() How can I update my teddcloud instance?
How can I update my teddcloud instance?
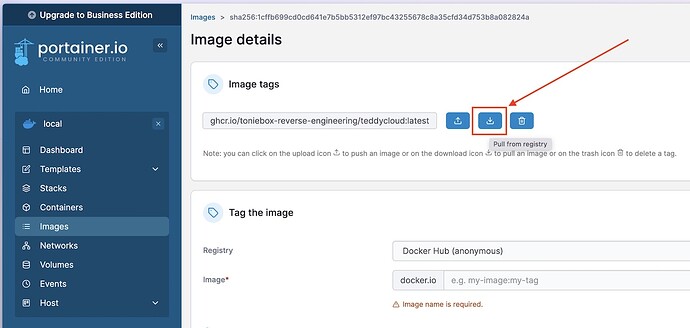
In Portainer, select “Images” from the menu, choose your teddycloud image and push the “pull from registry” button.
![]() How can I switch to devleopment builds?
How can I switch to devleopment builds?
In Portainer → Stacks → teddycloud choose the “Editor” tab and change the image tag at the end:
image: ghcr.io/toniebox-reverse-engineering/teddycloud:develop
Click on “Update the stack” to apply the changes.
That’s it I guess. Any feedback or corrections appreciated! Have fun.
