Path A – Using TeddyBench to write audio files to the SD card
Chapter 0 – Preparation
CLICK HERE TO EXPAND CHAPTER 0
You either have official Tonies whose contents you wish to manipulate or you bought SLIX-L tags to create your own Tonies.
If you have SLIX-L tags, don’t put them on your Toniebox before you didn’t read and noted their UIDs with an NFC scanner (e.g. via NFC Tools or NFC TagInfo by NXP) or else you won’t be able to easily read the UIDs anymore. Learn more about reading the UIDs in Chapter 2.2B
Path A works for every hardware revision!
Summary Chapter 0:
- You need:
- a Toniebox
- either:
- an official Tonie that was once connected to the Toniebox
- or an SLIX-L tag and an NFC scanner app
- a microSD reader
- a Windows PC with internet connection
Chapter 1 – Remove the SD card
CLICK HERE TO EXPAND CHAPTER 1
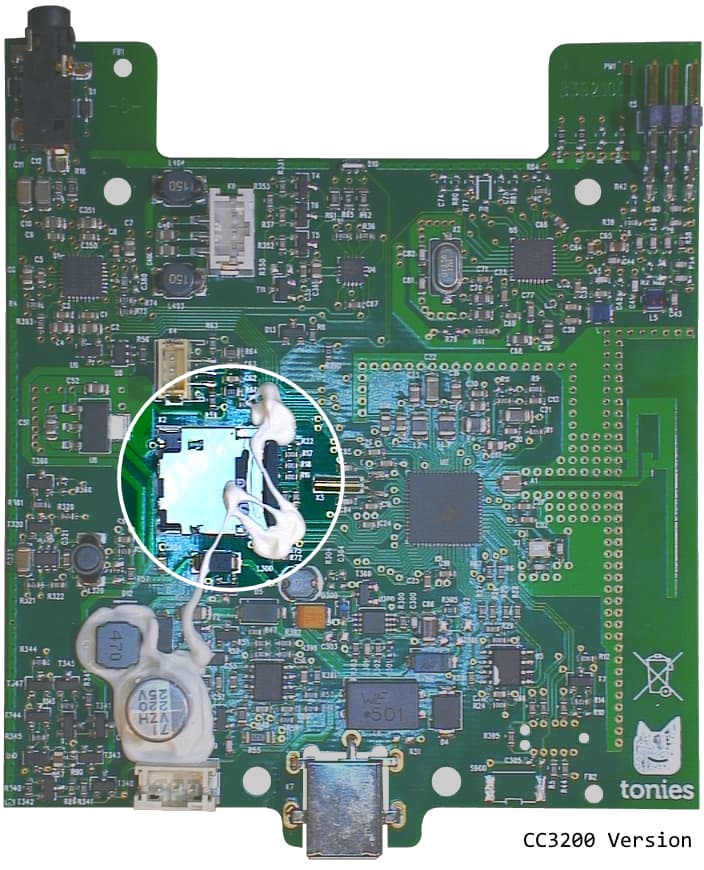
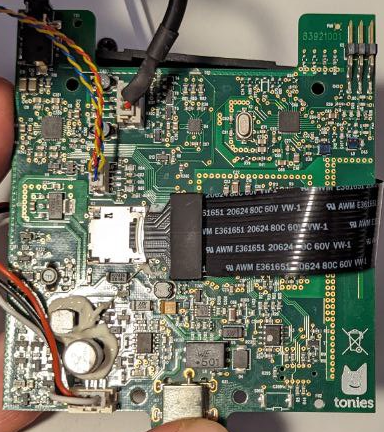
First of all you need access to the SD card of your Toniebox. Learn more here about opening the device in the forum. After disassembling the device you have access to the bare circuit board.
location of the SD card
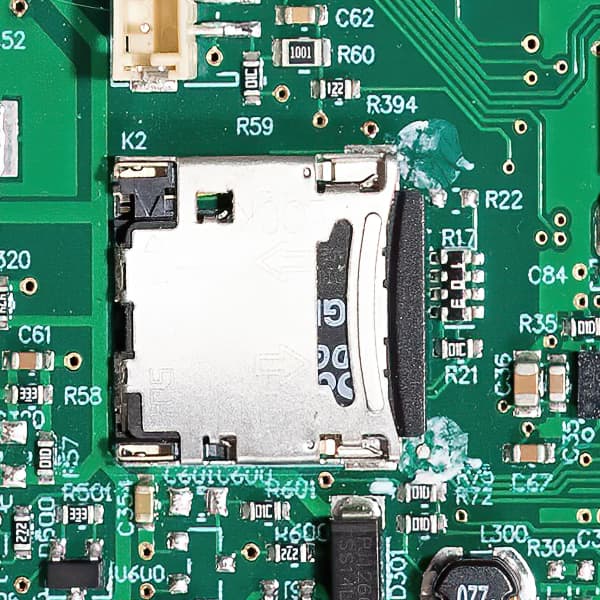
glue removed from cage
The SD socket is secured with white silicone glue. You can scrape it off carefully. The best way to do this is to lay the board flat on a table, orient it with the power plug facing your belly and scraping the glue to the right with your fingernails.
When the glue is removed, pull the cage that holds the SD card gently to the right to unlock it. It should move about 2mm and flip up by itself. Now you can pull the SD card out of the socket.
Summary Chapter 1:
- open Toniebox
- remove glue from SD cage
- push SD cage to the right
- eject SD card
Now you’re ready to plug the SD into your SD reader and connect it to your Windows PC
Chapter 2 – Starting TeddyBench for the first time
CLICK HERE TO EXPAND CHAPTER 2
You have to download the latest TeddyBench.zip from GitHub, extract it and open TeddyBench on your Windows machine. TeddyBench automatically scans for external drives, so make sure that no other USB drive is connected (or choose the drive manually in File > Open Directory).
TeddyBench first start
TeddyBench correctly identified a Tonie
TeddyBench couldn’t find Tonie in tonies.json
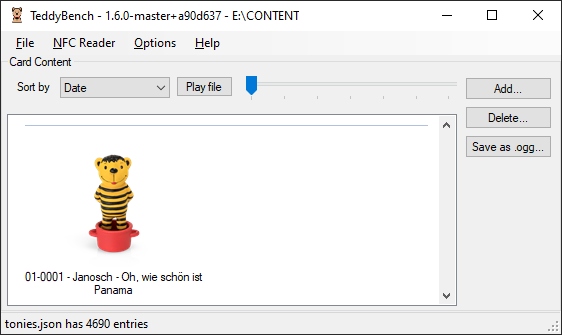
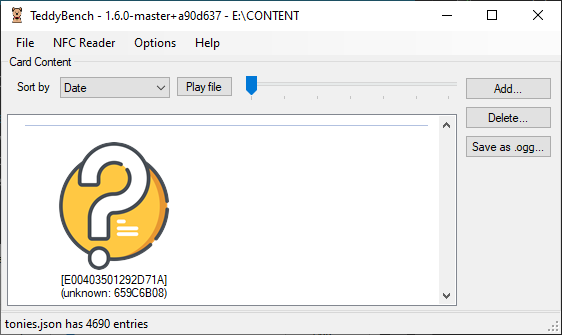
If you already connected a Tonie with your Toniebox, you should see an entry like
“01-0001 - Janosch - Oh, wie schön ist Panama”. If the entry looks more like
“[E0043501292D71A] (unknown: 659C6B08)” you either have no internet connection, started the program without extracting it first or got a Tonie with an audio-ID that isn’t in the database yet. In the last case, please report it to revvox to update the database (select the unknown entry, click Help > Report selected Files and enter the full name of your Tonie and a preferrably a link in the comment section. If you plan to report many figurines, please get in touch with Team revvox before, so they may provide a more efficient way for bulk reporting.)
Chapter 2.1A – Identify your Tonie’s UID
Like stated before, you either have a readable title representing the content of your Tonie or a hexadecimal number.
In the first case, simply right-click the entry, hit Assign new UID and note the displayed string. This is your Tonies UID.
In the second case, the hexadecimal number is already the UID of your Tonie.
Every UID begins with E0040350, the last 8 digits are unique.
Chapter 2.1B – Identify your the UID of your SLIX-L tags
If you bought individual SLIX-L tags, DON’T PUT THEM ON YOUR TONIEBOX YET!
The Toniebox activates the tags’ privacy mode, which can only be unlocked with a special command. Rather use your smartphone and an NFC reader app (see chapter 0 – Preparation) to read the UIDs from the tags.
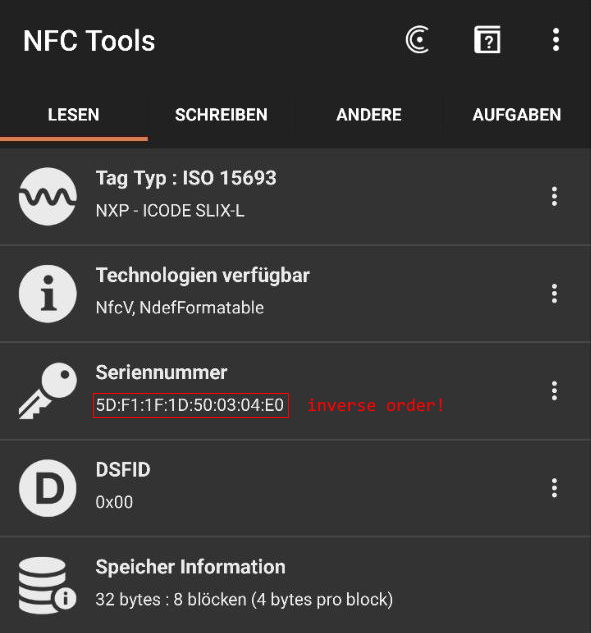
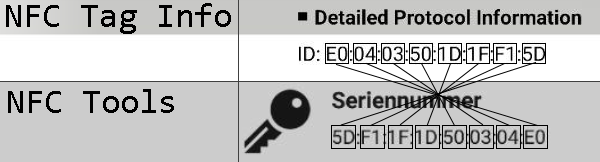
Please note that NFC Tools inverts the order of the individual blocks. If your tags’ UID is
E0:04:03:50:1D:1F:F1:5D, NFC Tools displays 5D:F1:1F:1D:50:03:04:E0.
Every UID begins with E0:04:03:50, the last 8 digits are unique.
Write the UID down.
Identfying the UID correctly
reading UID with NFC TagInfo by NXP
reading UID with NFC Tools
comparison of both apps
Chapter 2.2 – Uploading files to your SD card
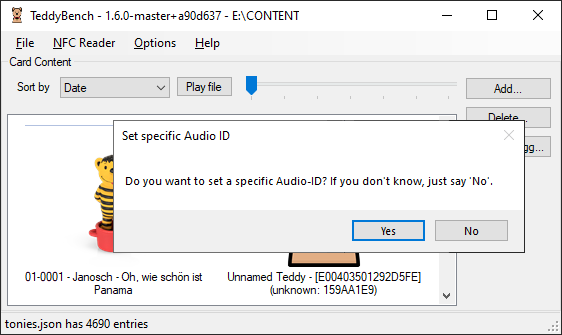
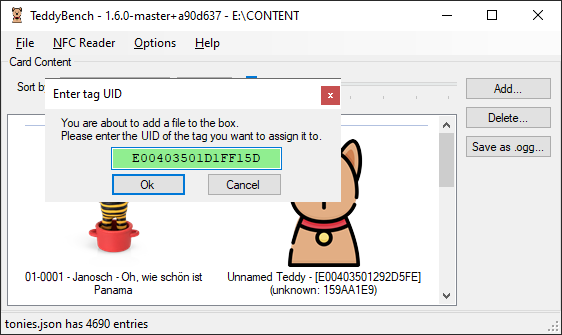
Now click Add… and select one or more .mp3-files that you want to upload. Just select all desired files and press Open. You don’t want to assign a specific Audio-ID at this point, so press ‘no’. Next you have to enter the UID of the tag, that should be linked to your uploaded files and click Ok. If you selected multiple files, you can now define an order for your files (since TeddyBench v1.6.0). Every single file will be a single track on your customized Tonie, that can be skipped with a slap to the side of the Toniebox. Otherwise you’re asked if you really want to upload only one file.
After confirming your choice, your file(s) are encoded and copied to your SD card.
Using TeddyBench
Summary – Chapter 2
- download, extract and start TeddyBench
- read your Tonie’s or SLIX-L tag’s UID
- upload new content
Chapter 3 – (optional) Understanding the directory structure
CLICK HERE TO EXPAND CHAPTER 3
All the playable contents of your Toniebox are placed in sd://CONTENT. By default, there are two folders: 00000000 and 00000001. These are system files.
For every Tonie there is an additional folder, e.g. “5DF11F1D/”. In this folder there is a file named “500304E0”. This name is the same for every Tonie Audio File (TAF). This kind of file doesn’t have an extension.
The folder name consists of the 8 last digits of your UID, in pairwise reversed order (or just the first 8 digits from the UID read by NFC Tools – see chapter 2.1B). So if you want to have one file linked to another tag, you can just change the folder’s name accordingly.
Chapter 4 – Enjoying new contents on your Toniebox
CLICK HERE TO EXPAND CHAPTER 4
Chapter 4.0 - (optional) Install an SD extension
CLICK HERE TO EXPAND CHAPTER 4.0
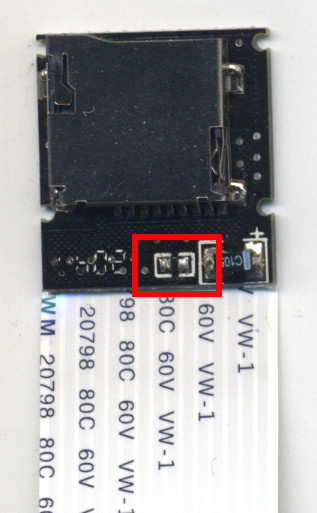
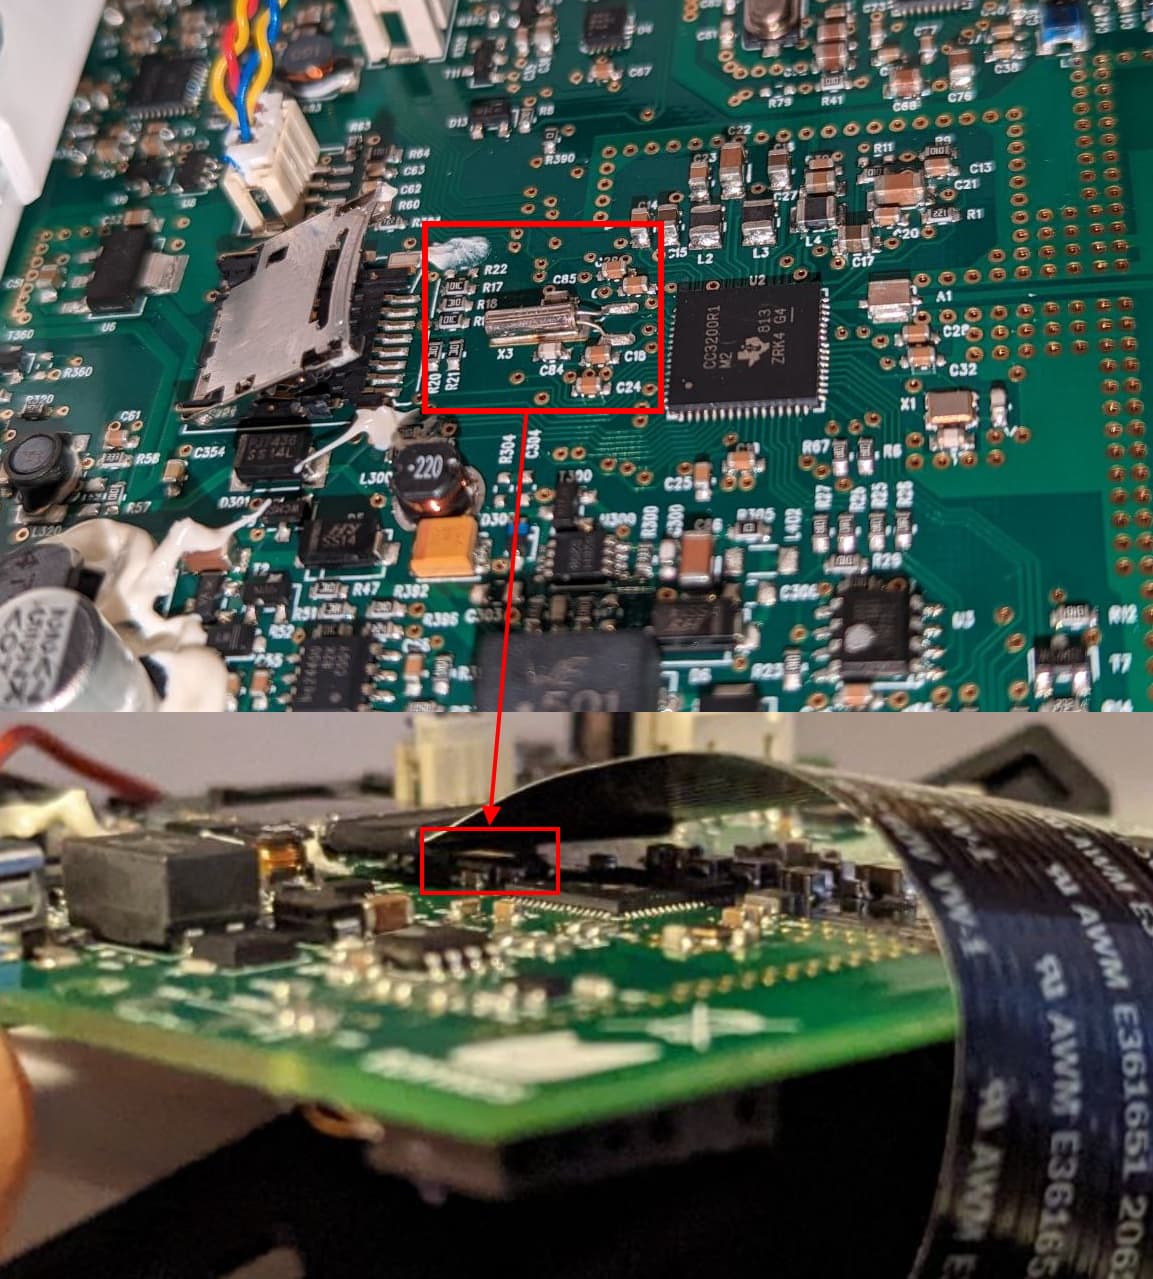
To simplify future access to the SD card, you can install an SD extension like this one. 15cm cable length is sufficient. You have to remove the plastic case to make it fit in your Toniebox. You also have to remove the resistor, so the Toniebox can detect the SD card.
Location of the resistor
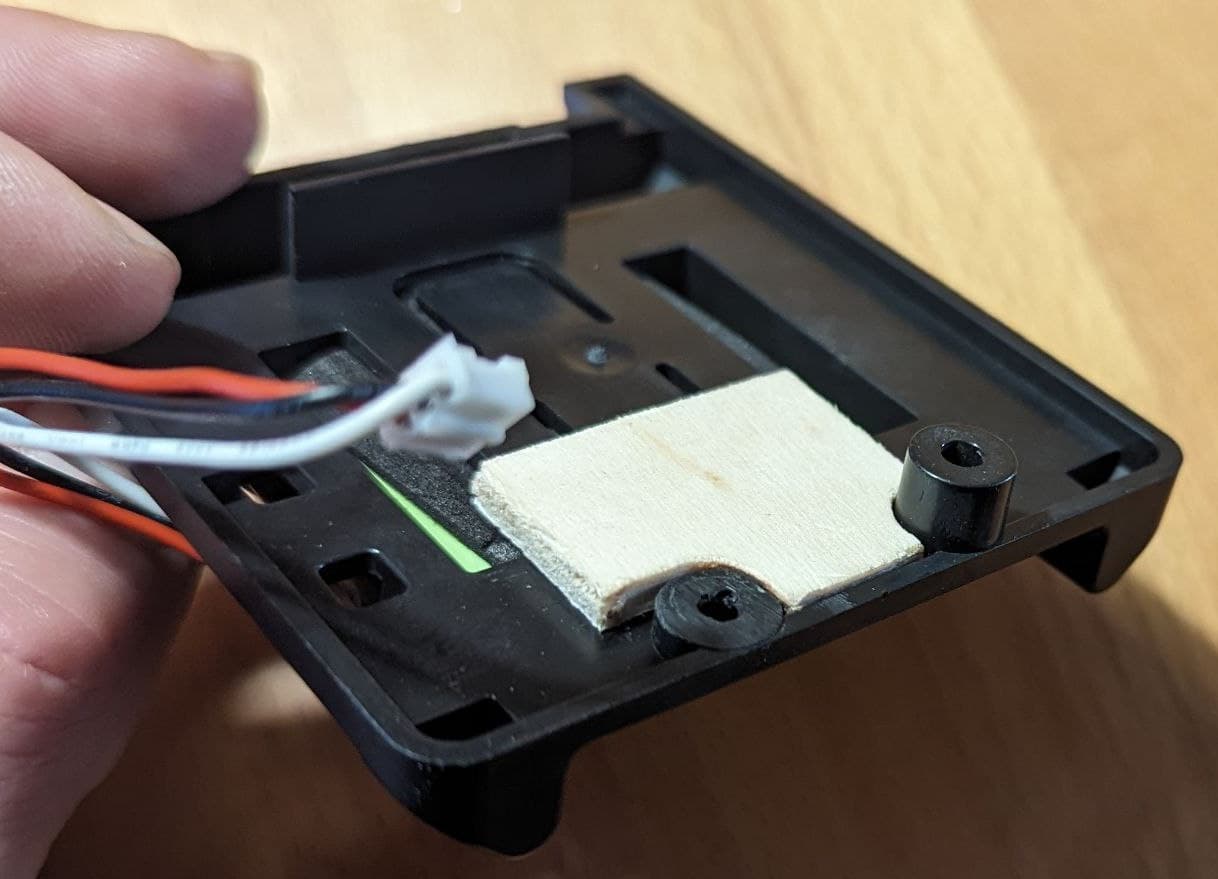
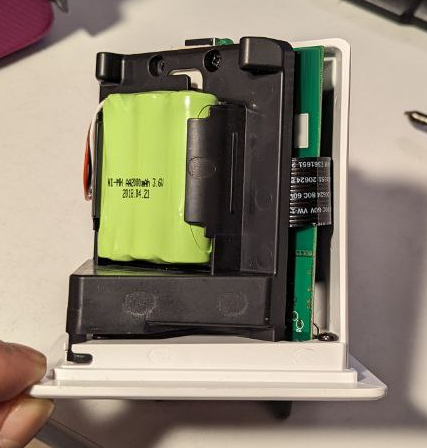
To have enough space for the SD extension you have to remove one of the plastic standoffs located on the backside of the battery mount. Just use a hack saw and/or file.
Next you have to stick the extension to the battery mount. I used a little piece of plywood and sticky tape, you could also just use hot glue. Adjust the location of the SD slot, so that you can eject the SD easily but it shouldn’t collide with the charging dock when inserted.
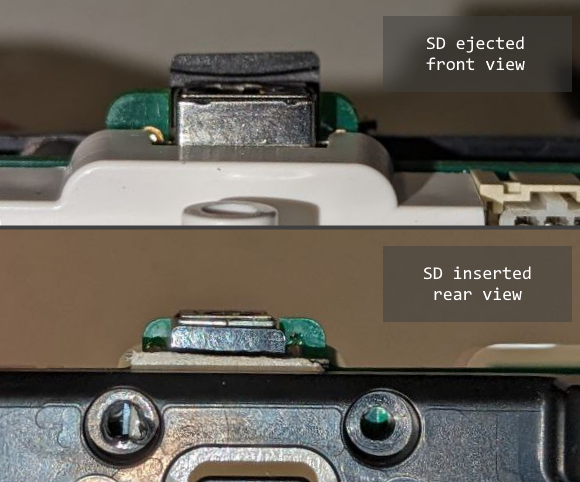
Placement of the external SD slot
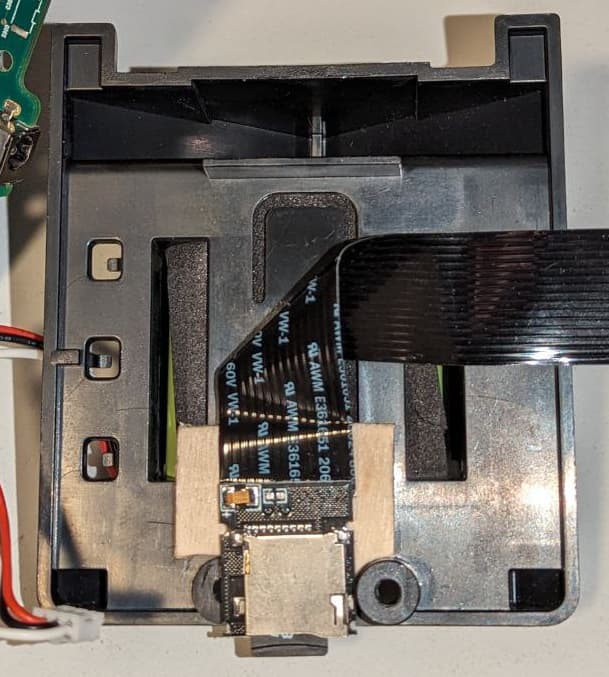
Now we can fold the cable carefully (don’t fold it sharply, you have enough room for a nice loop).
Lead the cable around the outer edge of the battery mount and the circuit board and plug the end into the SD slot. When closing the SD cage, notice the crystal on the circuit board (the little shiny cylinder). The SD cable will collide with it, you just have to push on the SD cage and close it carefully. The adapter will bend slightly, no worries.
Routing the SD cable
Reassemble the Toniebox and make sure that the SD cable doesn’t get pinched anywhere.
Installed SD extension
Chapter 4.1 - First boot with your new content
Now you can place the SD back in your Toniebox and assemble the device in reverse order. You should now either block the internet connection of the Toniebox in your router or activate Offline Mode. Instead, the Toniebox will compare its contents with the cloud and throw the files in the folder sd://TRASHCAN.
To activate Offline Mode, just hold both ears until a sound plays and the LED blinks blue and after that hold one ear until, the box says “Offline Mode activated” and the LED turns white.
Offline Mode will automatically be deactivated after the Toniebox loses power unexpectedly (but not when switching to standby mode).
If you used a temporary hotspot for the initial setup, just deactivate it.
Note, that the Toniebox remembers up to 6 wifi connections. If the last registered network is not available, the Toniebox will try to connect to the other known. If you do a factory reset (turn the Toniebox upside down, plug in the charging dock, hold both ears until a sound is heard) it will forget all network settings.
Please note that SLIX-L tags can’t be placed directly on the box. There has to be a gap of a few millimeters, otherwise the box can’t detect the tags.
Summary – Chapter 4
- (optional) install an SD extension
- plug the SD into your Toniebox
- reassemble the Toniebox
- block the Toniebox from accessing the internet by
- Place Tonies or SLIX-L tags (with a little gap) on your Toniebox
- Enjoy!